Creating a Condition File Using the Graphical User Interface
A user may construct the condition.txt file by hand or by using the Graphical User Interface.
Launching the Graphical User Interface
First, change to the directory where you want the output files to be stored; for the following example, we will store the output in the directory rmgRun, located in the $RMG directory.
For Linux users, run the following commands to launch the GUI:
cd $RMG/rmgRun
java -Xmx500m -classpath $RMG/software/rmg/RMG.jar GUI > output &
For Windows users, run the following commands to launch the GUI:
cd "%rmg%"\rmgRun
java -Xmx500m -classpath "%rmg%"\software\rmg\RMG.jar GUI > output &
The “Initial Conditions” tab
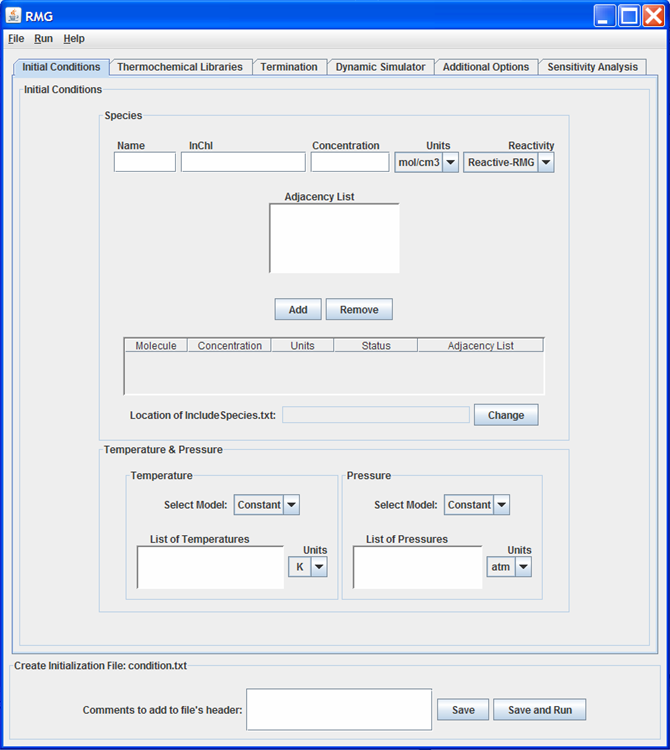
Initial Conditions tab
This tab of the GUI allows the user to enter the Reactants, Inert Gases, and Initial Conditions for the simulation.
Reactants and Inert Gases
For each species, a “Name,” “Concentration,” “Units,” and “Reactivity” must be specified. The three options for “Reactivity” are:
- “Inert” - a species for which RMG will not build a reaction mechanism for
- “Reactive-User” - a species for which RMG will build a mechanism for, but only according to the list of reactions the user has provided
- “Reactive-RMG” - a species for which RMG will build a mechanism for, according to the reaction family templates located in the RMG_database/kinetics folder
If the species is selected as “Inert”, no structural information for the molecule is necessary. RMG only recognizes the following Inerts: N2, He, Ne, Ar.
If the species is selected as either “Reactive-User” or “Reactive-RMG”, the user must supply structural information about the molecule. This information may be provided in one of three ways: adjacency list, InChI, or .mol file.
An example of an adjacency list (for methane) is:
1 C 0 {2,S} {3,S} {4,S} {5,S}
2 H 0 {1,S}
3 H 0 {1,S}
4 H 0 {1,S}
5 H 0 {1,S}
An equally valid adjacency list for methane (with the Hydrogen atoms removed) is:
1 C 0
If the user knows the InChI of the molecule (and the InChI executable is located in the RMG/software/InChI folder), the GUI will convert the InChI to an adjacency list upon pushing the “Add” button. If using either InChI software version 1.01 or software version 1.02beta, the InChI for methane is:
InChI=1/CH4/h1H4
However, if using the InChI software version 1.02 for Standard InChI/InChIKey, the InChI for methane is:
InChI=1S/CH4/h1H4
Please make sure the InChI you pass to the RMG GUI is consistent with the InChI version located in the $RMG\software\InChI folder. Upon pushing the “Add” button, if neither an adjacency list nor InChI have been provided, the GUI will ask the user for the location of the .mol file associated with this species. If the InChI executable is in the proper folder, the GUI will convert the .mol file to an adjacency list.
The user may add/remove species to the model by clicking the appropriate buttons.
Reactive-User Species
If a “Reactive-User” species is added to the model, the GUI will ask the user for the location of the IncludeSpecies.txt file. If no “Reactive-User” species are added to the model, the “Location of IncludeSpecies.txt” field will remain inactive.
Initial Conditions
RMG currently only has one pressure/temperature model: “Constant”. However, the user may specify a list of temperatures and pressures for which to build the reaction mechanism. The list of temperatures (or pressures) should be separated from one another with a blank space or a return carriage.
The “Thermochemical Libraries” tab
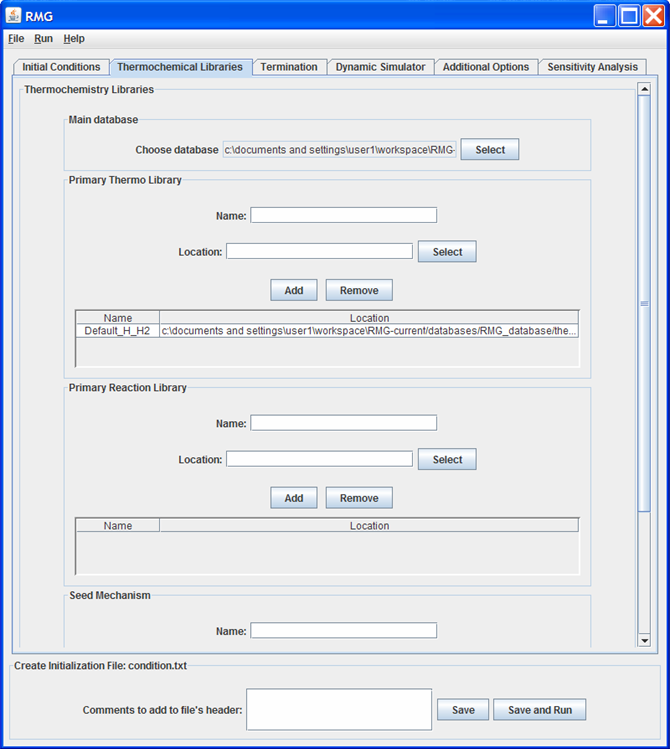
Thermochemical Libraries tab
This tab of the GUI allows the user to enter the location of the thermochemical libraries RMG will use in building the model.
The default location of the Main Database is the RMG/database/RMG_database folder. We recommend to use the default settings.
The default location of the Primary Thermo Library is the RMG/database/RMG_database/thermo/PrimaryThermoLibrary folder. We recommend to include this default primary thermo library. To add additional primary thermo libraries: Supply a Name, select the directory by pressing the “Select” button, and then push “Add”.
To add a Primary Reaction Library or Seed Mechanism: Supply a Name, select the directory by pressing the “Select” button, and then push “Add”.
Note
The order of the “Primary Thermo Libraries”, “Primary Reaction Libraries”, and “Seed Mechanisms” in the tables are important. The order established in the table will be conserved when writing the condition.txt file. For any reactions that appear in multiple “Primary Reaction Libraries” (or “Seed Mechanisms”), RMG will use the information contained in the first “Primary Reaction Library” (or “Seed Mechanism”) and ignore all others. Similarly, for any species that appear in multiple “Primary Thermo Libraries”, RMG will use the information contained in the first “Primary Thermo Library” and ignore all others.
The “Termination” tab
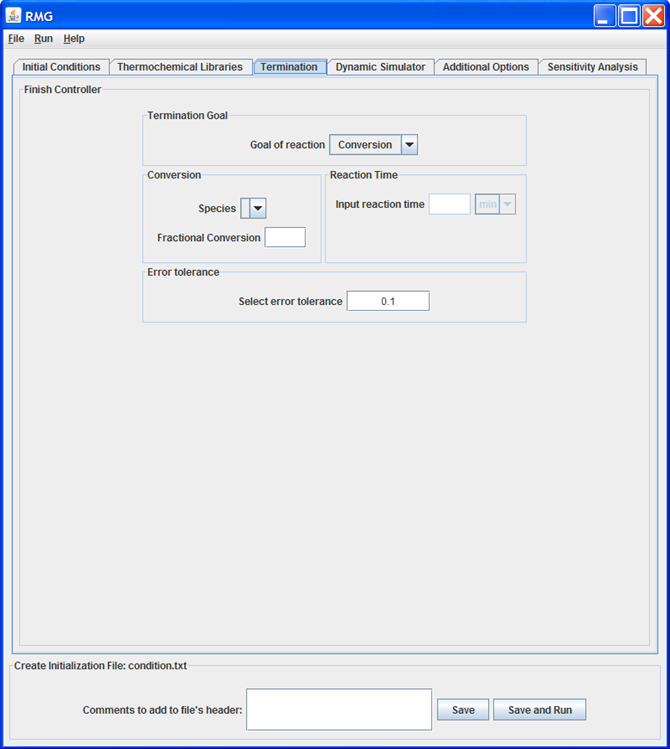
Termination tab
This tab of the GUI allows the user to specify the termination criteria for the model. A user may specify either the desired “ReactionTime” or “Conversion”.
If “Conversion” is selected, the user must specify a species and a fraction conversion (ranging from 0 to 1). The “Species” drop-down menu will only contain the “Reactive-RMG” and “Reactive-User” species specified in the Initialization tab.
If “ReactionTime” is selected, the user must specify the value and units of the desired reaction time.
Lastly, the user must specify an “Error tolerance” for the model. If building a mechanism for a new system, we recommend starting with a high “Error tolerance” (e.g 0.1).
The “Dynamic Simulator” tab
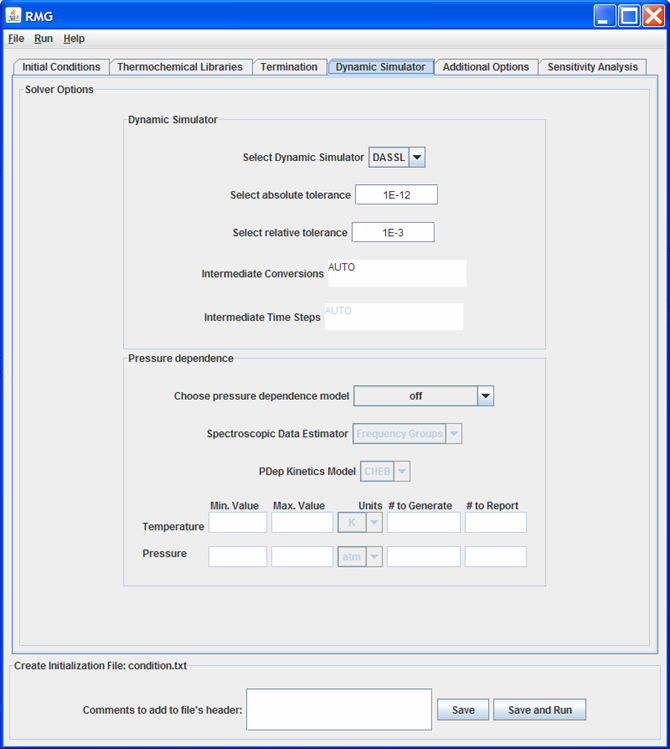
Dynamic Simulator tab
This tab of the GUI allows the user to specify options for:
The ODE Solver
The user must select a “Dynamic Simulator” and set the Absolute and Relative Tolerances for that Dynamic Simulator. The user may also select Intermediate times or conversions for RMG to check whether the reaction mechanism needs to be enlarged. We recommend using the automatic time stepping, which is invoked by typing “AUTO” in the “Intermediate” time/conversion fields.
The “Intermediate Conversions” field will be enabled (and the “Intermediate Time Steps” field will be disabled) if the “Termination Goal” was chosen as “Conversion” on the Termination tab.
Note
If the user specifies “Intermediate Time Steps,” the values must have units of Seconds.
The pressure dependence model
The user must specify a pressure dependence model. The options are:
- off
- Modified Strong Collision
- Reservoir State
If the user specifies a pressure dependent model, the “Spectroscopic Data Estimator” and “PDep Kinetics Model” fields will be enabled. The only option for the “Spectroscopic Data Estimator” are:
- Frequency Groups
The options for the “PDep Kinetics Model” are:
- CHEB - resulting in Chebyshev polynomials as auxiliary information for pressure-dependent reactions
- PLOG - resulting in Modified Arrhenius parameters at different pressures as auxiliary information for pressure-dependent reactions
- Rate - resulting in no auxiliary information and modified Arrhenius parameters of A 0.0 0.0, where A = k(T,P)
If CHEB is selected as the “PDep Kinetics Model”, the fields near the bottom of this tab will become enabled. These fields are optional. However, if data is entered into any of the eight fields, all eight fields must be filled.
The “Additional Options” tab
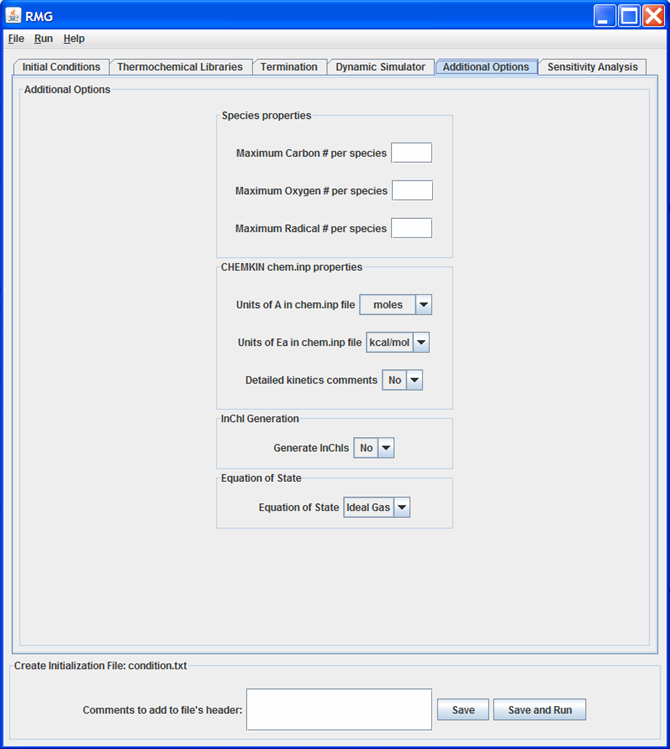
Additional Options tab
This tab allows the user to specify additional (and usually optional) information to RMG.
Species properties
The user may choose to override any of the following species properties, by entering data into the appropriate field:
- Maximum carbon number per species
- Maximum oxygen number per species
- Maximum radical number per species
The user has the option to enter data for none, one, two, or all three of these fields. If left blank, RMG will use the default values.
CHEMKIN chem.inp properties
The next set of fields allow the user to specify the units of the Arrhenius parameters ‘A’ and ‘Ea’ for the chem.inp file generated by RMG. The user may also specify if they want the concise or verbose comments for each reaction in the chem.inp file. Refer to Chemkin options for more details.
Optional fields
Some optional fields the user may change are:
- Equation of State
- InChI generation
The user may also choose to turn off/on the generation of InChIs. If the user chooses to turn InChI generation on, the InChI executable (v 1.01) must be located in the RMG/software/InChI folder.
The user currently has only one option for the “Equation of State”:
- Ideal Gas
The “Sensitivity Analysis” tab
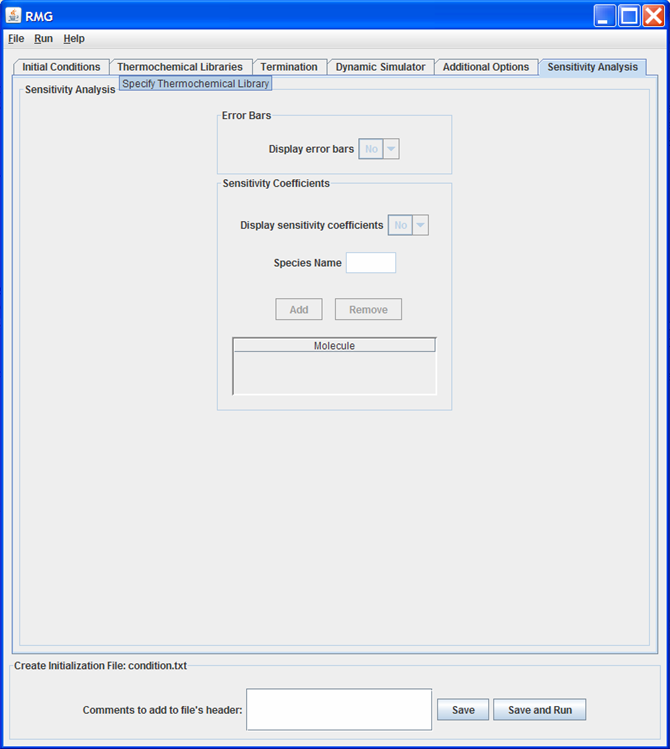
Sensitivity Analysis tab
This tab of the GUI allows the user to specify options for error bars and sensitivity coefficients. The features of this tab will only be active if “DASPK” is selected as the “Dynamic Simulator” on the Dynamic Simulator tab.
The user may turn the generation of error bars “on” or “off.” If turned on, upper and lower error bars will be generated for all species in the model.
The user may also turn the generation of sensitivity coefficients “on” or “off.” The sensitivity coefficients will only be generated for the species listed in the “Molecule” table. The order in which the species appear in the table is not important.
Saving the file
To save the file, the user can either press the “Save” button near the bottom of the GUI or by selecting “File” –> “Save” from the navigation toolbar. The file does not have to be named condition.txt. Also, the user may add additional comments to the condition.txt file by adding information to the text field at the bottom of the GUI. These comments will be added to the header of the saved file.
To save and immediately run a file, the user can press the “Save and Run” button near the bottom of the GUI.
Opening a file
To open and import the information from an already written condition.txt file, the user can select “File” –> “Open” from the navigation toolbar.
Note
The comments in the header of the file will not be imported.
Running the file
To run a file without viewing it, the user can select “Run” –> “Run RMG” from the navigation toolbar.
![]()
Documentation Contents
- Creating a Condition File Using the Graphical User Interface